Did you know that many no-bake desserts can be ready in under an hour and still taste restaurant-quality? If you love cookies-and-cream flavors, these no-bake Oreo cheesecake cups deliver creamy texture, crunchy cookie bites, and an easy prep that fits busy schedules. This recipe for no-bake Oreo cheesecake cups is ideal for last-minute parties or simple weeknight treats.
For a playful twist, check out a related Oreo cookie dirt cup recipe that uses similar layering techniques and crowd-pleasing flavors.
Ingredients List
- 1 (8 oz / 226 g) block cream cheese, softened — substitution: use light cream cheese for fewer calories; sensory note: silky, tangy base that becomes luxuriously smooth when whipped.
- 1 (8 oz / ~226 g) tub Cool Whip or whipped topping — substitution: use chilled whipped cream or a Greek yogurt-whipped topping for a fresher tang; sensory note: airy, light texture that loosens the cream cheese.
- 2/3 cup powdered (confectioners’) sugar (~85 g) — substitution: powdered erythritol or a reduced amount of sugar; sensory note: dissolves fully for a smooth, not-grainy sweetness.
- 1 teaspoon pure vanilla extract — substitution: use a scrape of vanilla bean for extra aroma.
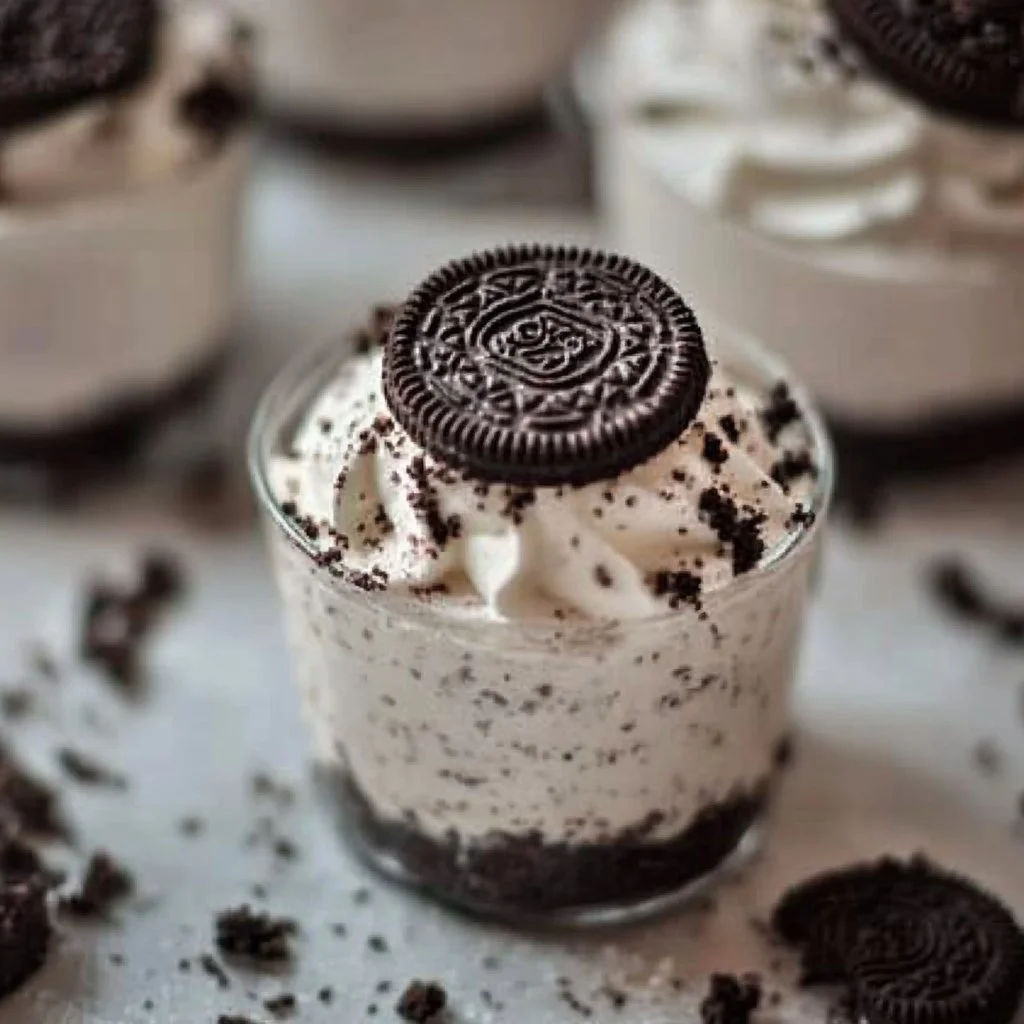
- 24–26 Oreo cookies (more as desired) — substitution: sandwich cookies like Golden Oreos, gluten-free sandwich cookies, or crushed graham crackers for a different profile; sensory note: crunchy chocolate wafers add contrast and nostalgia.
- Optional for topping: extra whipped cream, chocolate shavings, mini chocolate chips, or fresh strawberries — sensory note: adds visual appeal and textural contrast.
Timing
- Preparation time: 15–20 minutes (crushing cookies and whipping the filling).
- Chilling time: about 1 hour (or longer for firmer texture).
- Total time: ~1 hour 15–20 minutes.
Contextual comparison: Compared with baked cheesecakes that can take over two hours plus cooling, these cups are far quicker and fridge-set rather than oven-dependent, making them ideal for warm weather or quick entertaining.
Step-by-Step Instructions
Step 1 — Crush the Oreos
Place the Oreos in a plastic bag and seal. Using a rolling pin or a sturdy wooden spoon, crush the Oreos into mostly fine crumbs with a few small chunks for texture. Spoon 1 1/2–2 tablespoons of the crushed Oreos into the bottom of six small dessert dishes (each dish should hold about 3/4 to 1 cup). Set aside the remaining crumbs.
Step 2 — Make the Cream Cheese Filling
Using a hand or standing mixer, whip the softened cream cheese with the powdered sugar until creamy and smooth, scraping the bowl as needed. Add the vanilla and beat to incorporate fully. The mixture should be silky with no lumps.
Step 3 — Fold in Cool Whip and Cookies
Gently fold the Cool Whip into the cream cheese mixture until evenly incorporated and light. Fold in about half of the remaining crushed Oreos for a speckled, cookie-studded filling without overworking the airiness.
Step 4 — Assemble and Chill
Divide the cheesecake filling evenly across the six dishes and gently press onto the crushed Oreo base so each cup has a thin cookie crust and a creamy top. Chill for about 1 hour or until firm enough to hold garnish.
Step 5 — Top and Serve
Top each cup with a dollop of whipped cream and sprinkle additional crushed Oreos before serving. Enjoy immediately after chilling for best texture.
Nutritional Information
(Nutritional estimates per serving — recipe yields 6 servings; values approximate)
- Calories: ~530 kcal per serving
- Total Fat: ~34 g
- Saturated Fat: ~16 g
- Carbohydrates: ~47 g
- Sugars: ~34 g
- Protein: ~5 g
- Fiber: ~1 g
Note: Values vary depending on exact brands and substitutions; using light cream cheese and fewer cookies reduces calories and fat.
Healthier Alternatives for the Recipe
- Swap full-fat cream cheese for low-fat or Neufchâtel cream cheese to cut calories.
- Replace Cool Whip with lightly sweetened whipped Greek yogurt for added protein and tang.
- Use powdered erythritol or a smaller amount of powdered sugar to reduce added sugars.
- Substitute half the Oreos with crushed nuts or graham crackers to lower refined sugar content and add fiber.
Serving Suggestions
- Serve in small clear cups layered with fresh raspberries or sliced strawberries for acidity and color.
- Turn them into parfaits by alternating layers of filling with whole Oreo halves or broken pieces.
- For a party platter, pipe the filling into mini tart shells and top with chocolate curls.
- Try pairing with coffee or a milkshake for a nostalgic, dessert-bar feel.
For another playful presentation idea, compare layering techniques with this Oreo cookie dirt cup recipe.
Common Mistakes to Avoid
- Using cold cream cheese — it leads to lumps; always soften to room temperature.
- Overmixing after adding Cool Whip — this can deflate the airy texture.
- Adding too many cookie crumbs to the base — crust should be thin to balance filling.
- Skipping chilling time — the cups need at least an hour to set properly.
Storing Tips for the Recipe
- Refrigerate in an airtight container or cover dishes with plastic wrap for up to 3 days.
- For longer storage, freeze un-topped cups for up to 1 month; thaw overnight in the refrigerator before adding fresh toppings.
- Add crunchy toppings just before serving to avoid sogginess.
Conclusion
Light, creamy no-bake Oreo cheesecake cups come together quickly for a decadent, fuss-free dessert. With a crunchy cookie base and pillowy filling, they delight any crowd. Try the recipe, leave a review, comment with tweaks, or subscribe for more easy sweets — I’d love your feedback and rate this post.
Find a similar detailed method at No Bake OREO Cheesecake Cups – Best Friends For Frosting, view variations and mini versions at No Bake Mini Oreo Cheesecakes | Life, Love & Sugar, or explore another classic take at No-Bake Oreo Cheesecake Cups – Buttercut.
FAQs
-
How long will these keep in the fridge?
- Up to 3 days covered; add garnishes just before serving.
-
Can I make them ahead for a party?
- Yes — assemble and chill up to a day in advance for best texture.
-
Can I use homemade whipped cream instead of Cool Whip?
- Absolutely. Chill the bowl and whip to soft peaks, then fold gently into the cream cheese.
-
Are these freezer-friendly?
- Yes. Freeze without fragile toppings for up to a month; thaw overnight in the fridge.
-
Can I halve or double the recipe?
- Yes — scale ingredients proportionally; ensure dish sizes remain similar for proper chilling.

No-Bake Oreo Cheesecake Cups
Ingredients
Method
- Place the Oreos in a plastic bag and seal. Using a rolling pin or a sturdy wooden spoon, crush the Oreos into mostly fine crumbs with a few small chunks for texture.
- Spoon 1 1/2–2 tablespoons of the crushed Oreos into the bottom of six small dessert dishes. Set aside the remaining crumbs.
- Using a hand or standing mixer, whip the softened cream cheese with the powdered sugar until creamy and smooth, scraping the bowl as needed.
- Add the vanilla and beat to incorporate fully until the mixture is silky with no lumps.
- Gently fold the Cool Whip into the cream cheese mixture until evenly incorporated and light.
- Fold in about half of the remaining crushed Oreos for a speckled filling without overworking the airiness.
- Divide the cheesecake filling evenly across the six dishes and gently press onto the crushed Oreo base.
- Chill for about 1 hour or until firm enough to hold garnish.
- Top each cup with a dollop of whipped cream and sprinkle additional crushed Oreos before serving.
- Enjoy immediately after chilling for the best texture.