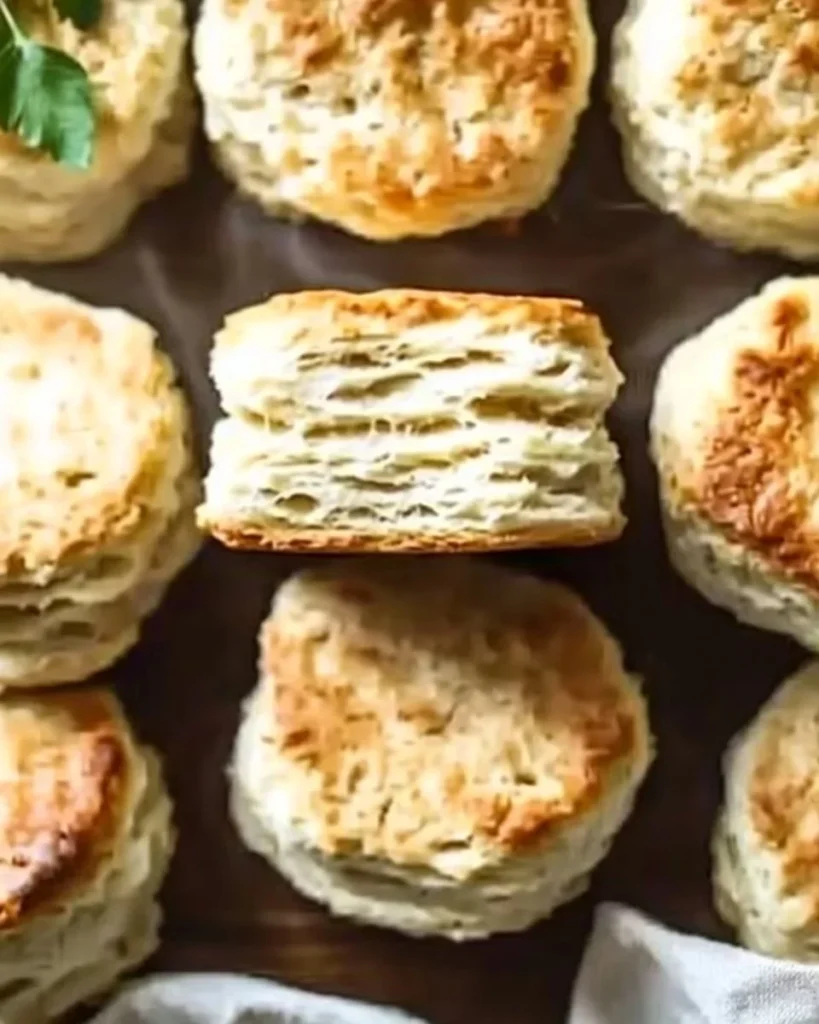
Curious how a bit of sourdough discard can transform into golden, flaky sourdough discard biscuits that taste like bakery treats? With just pantry staples and cold butter, these biscuits showcase tangy starter flavor and pronounced layers without hours of fuss.
This approachable method highlights texture: little butter petals melt into pockets of steam, producing tender crumb and crisp edges. It’s a terrific way to reduce waste and reward yourself with warm biscuits any day of the week.
Ingredients List
- 2 cups (240 grams) all-purpose flour — can substitute half with whole wheat pastry flour for nuttier flavor and denser crumb.
- 1 tablespoon baking powder — room-temperature, fresh for best rise.
- 1/4 teaspoon baking soda — helps with browning and tenderness.
- 1/2 teaspoon kosher salt — balances flavor; use fine salt and adjust to taste.
- 1 tablespoon granulated sugar (optional) — for a hint of sweetness and browned tops.
- 4 ounces (113 grams) unsalted butter, very cold — cut into cubes or grated; cold butter creates visible layers and a flaky, tender mouthfeel.
- 1 cup (280 grams) sourdough discard* — lends bright tang and depth; hydration varies, so dough hydration may change.
- 1/2 cup whole milk plus a bit more for brushing — adds richness and encourages browning; use buttermilk for extra tenderness and tang.
Optional substitutions and sensory notes:
- Butter alternatives: chilled vegetable shortening yields a slightly crisper texture; olive oil (cold) can be used but loses flakiness.
- Milk swaps: yogurt or buttermilk increases tenderness and tang; non-dairy milks (soy, oat) work but reduce richness.
- If using whole wheat pastry flour the biscuits will be slightly denser and nuttier, with a deeper color and heartier aroma.
Timing
- Active preparation time: 20–30 minutes (mixing, cutting butter, shaping).
- Chill time: 30 minutes in freezer (alternative: refrigerate 2–48 hours).
- Bake time: 15–18 minutes.
- Total time (with 30 min chill): ~65–78 minutes.
Contextual comparison: these biscuits take only slightly longer than standard quick-bake biscuits due to the chill step, but that wait produces noticeably more pronounced layers and flakiness. If you skip chilling, you save time but may lose some lift and definition.
Step-by-Step Instructions
Step 1 — Combine starter and milk
Mix sourdough starter and milk together in a glass measuring cup and set aside.
Step 2 — Mix dry ingredients and incorporate butter
Mix flour, baking powder, baking soda, salt, and sugar in a mixing bowl. Add butter cubes or grated butter.
Step 3 — Make butter “petals”
Press butter cubes between your thumb and index finger to create flat petals of butter. If using grated butter you can skip this step.
Step 4 — Distribute butter through the dry mix
Mix butter into dry ingredients until you have it all flattened and dispersed. It’s okay if some pieces are smaller/larger than others as long as they are almost all in small, flat pieces. You can also use a pastry cutter, but using fingers creates those little petals that result in the best flakiness.
Step 5 — Add liquid and form shaggy dough
Drizzle in milk and starter mixture while stirring with a fork until a shaggy dough forms. If you feel your dough is wet enough, you may not need to add all of the mixture — this will strongly depend on how hydrated your starter is.
Step 6 — Turn out and shape
Dump dough onto a floured surface.
Step 7 — Fold for layers (optional)
Shape dough into a rectangle about 1 inch thick. Divide in half and stack one half on top of the other and press again into a 1-inch thick rectangle. Repeat this one or two more times. This step is optional but it creates really pronounced layers in the finished biscuits. If you skip it you will still have wonderful, tender biscuits. Also, if you want to simply scoop the biscuit dough and make drop biscuits you can do that as well and skip the shaping and stacking altogether.
Step 8 — Chill the dough
After stacking a few times, press dough into a 1-inch thick rectangle one final time and chill in the freezer for 30 minutes. You don’t have to do this, but it is highly recommended. Alternatively you can cover and refrigerate overnight or up to 48 hours.
Step 9 — Preheat oven
When dough is chilled and you are ready to bake, preheat oven to 400°F (200°C).
Step 10 — Cut the biscuits
After dough has chilled, cut into biscuits with a floured 2 1/2-inch cutter. Or you can cut the rectangle into 9 squares which many bakers prefer. Do not twist your cutter. Just go straight down and back up. Likewise if you are cutting with a knife or bench scraper, don’t use a sawing motion—just go straight down and back up.
Step 11 — Reshape scraps
Reshape any scraps by stacking them on top of each other and pressing down to a 1-inch thickness before cutting. The reshaped biscuits might look a little more craggy on top than the first cutting, but if you stack the scraps rather than squish them together, they will be just as flaky.
Step 12 — Bake
Place biscuits on a parchment-lined tray very close together but not touching. Brush tops with milk. If using these for something sweet like shortcakes, a sprinkle of sugar on top is nice. Bake in preheated oven until golden and no wetness shows on the sides, about 15–18 minutes.
Nutritional Information (approximate per biscuit; yields ~9 biscuits)
- Calories: ~220 kcal
- Total fat: ~12–14 g (saturated fat ~7–8 g)
- Carbohydrates: ~22–25 g (sugars ~1–2 g)
- Protein: ~4–5 g
- Fiber: ~1–2 g
- Sodium: ~250–300 mg
(Values are estimates and will vary by exact ingredients, portion size, and number of biscuits.)
Healthier Alternatives for the Recipe
- Use half whole wheat pastry flour to add fiber and nutrients with minimal toughness.
- Replace 1–2 tablespoons butter with mashed banana or unsweetened applesauce for reduced fat (texture will change).
- Swap whole milk for low-fat milk or cultured buttermilk for tang with slightly less fat.
- Reduce added sugar or omit entirely; biscuits remain tender without it.
Serving Suggestions
- Classic: warm with butter and jam or honey.
- Savory: split and fill with sausage, egg, and cheddar for breakfast sandwiches.
- Elegant: use as shortcake bases with macerated berries and whipped cream.
- Party: serve with herb butter, smoked salmon, or pimiento cheese for appetizers.
Common Mistakes to Avoid
- Overworking the dough — causes tough biscuits and lost layers. Handle gently.
- Using warm butter — butter must be very cold to create flakes.
- Twisting the cutter — this seals edges and prevents rise; press straight down and up.
- Skipping chilling entirely if you want pronounced layers — chilling firms butter and helps steam pockets form.
Storing Tips for the Recipe
- Short-term: store cooled biscuits in an airtight container at room temperature for up to 2 days.
- Refrigeration: keep in the fridge up to 5 days; reheat in a 350°F oven for 5–8 minutes.
- Freezing: flash-freeze baked or unbaked biscuits, then store in a freezer bag for up to 3 months. Reheat from frozen in a 350°F oven, adding a few minutes to bake time.
Conclusion
Buttery, flaky sourdough discard biscuits come together quickly using pantry staples and cold butter, offering layered texture and tang from your starter; prepare, chill briefly, then bake for golden tops. Try them warm, rate the recipe, leave a comment, or subscribe for more discard-forward baking inspiration and share your results.
For more technique ideas and variations, see Flaky 5-Ingredient Sourdough Discard Biscuits – Heartbeet Kitchen, read an easy step-by-step version at Sourdough Discard Biscuits (easy, buttery, flaky) – Wild Thistle Kitchen, and explore another approachable take at Easy and Delicious Flakey Biscuits Using Sourdough Discard.
FAQs
-
Can I use active sourdough starter instead of discard?
Yes — active starter works, but it may add more leavening/tang; reduce added milk slightly if the starter is very active. -
What if my discard is very wet?
Hold back some of the milk when mixing; add liquid gradually until dough is shaggy but manageable. -
How many biscuits does this yield?
Cutting into 2 1/2-inch rounds typically yields about 8–10 biscuits; cutting into squares may yield 9. -
Can I make drop biscuits instead?
Yes — scoop dough onto a baking tray for rustic drop biscuits; they’re quicker but less layered. -
Why did my biscuits not rise much?
Possible reasons: old baking powder, overhandling dough, butter too warm, or twist-cutting. Ensure fresh leaveners and minimal handling.

Sourdough Discard Biscuits
Ingredients
Method
- Mix sourdough starter and milk together in a glass measuring cup and set aside.
- In a mixing bowl, mix flour, baking powder, baking soda, salt, and sugar. Add butter cubes or grated butter.
- Press butter cubes between your thumb and index finger to create flat petals of butter.
- Mix butter into dry ingredients until flattened and dispersed.
- Drizzle in the milk and starter mixture while stirring with a fork until a shaggy dough forms.
- Dump dough onto a floured surface.
- Shape dough into a rectangle about 1 inch thick. Divide in half and stack one half on top of the other. Repeat this one or two more times if desired.
- Press dough into a 1-inch thick rectangle one final time and chill in the freezer for 30 minutes.
- Preheat the oven to 400°F (200°C).
- After dough has chilled, cut into biscuits with a floured 2 1/2-inch cutter.
- Reshape any scraps and cut again.
- Place biscuits on a parchment-lined tray close together but not touching. Brush tops with milk.
- Bake until golden and no wetness shows on the sides, about 15–18 minutes.


